
TL;DR
A closet can serve as a decent vocal booth, but it’s all about placement and treatment. Moving the rig away, sealing gaps, and adding absorbent materials improves sound quality without costly soundproofing. Remember, good placement beats just adding foam.
Ever wondered if your closet could double as a decent recording booth? It can. But it’s not just about stuffing foam panels everywhere. The real magic happens when you understand how sound behaves in tight spaces, and how your setup can make a big difference.
This guide breaks down practical, no-nonsense tactics. Expect to learn why placement beats treatment, how to keep your rig cool, and what limits you’ll hit with a ‘rig in the closet’ approach. Whether you’re streaming, recording, or just trying to quiet that noisy GPU, these tips will help you get the most out of your small space.
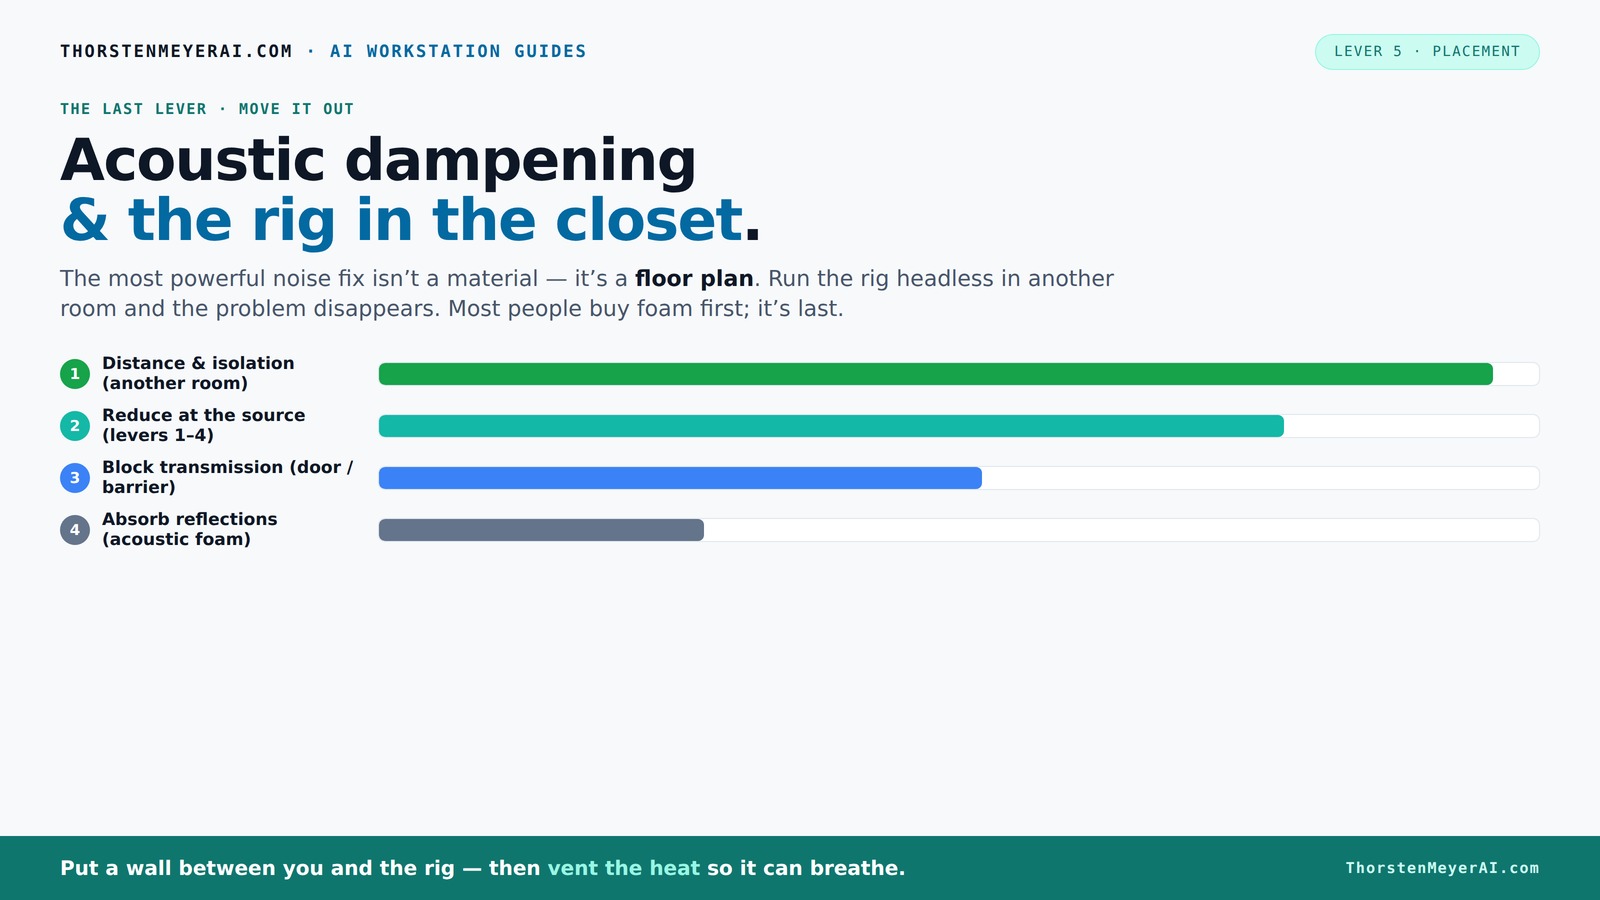
Acoustic dampening
& the rig in the closet.
The most powerful noise fix isn’t a material — it’s a floor plan. A rig you can’t hear because it’s in another room beats any amount of foam. Tap the approaches in Part 1 to see what actually works.
(another room)
(levers 1–4)
(door / barrier)
(acoustic foam)
Contain the noise, not the heat
Key Takeaways
- Prioritize placement: position your mic and gear to minimize reflections and avoid corners for better tone.
- Seal gaps around the door and use blankets or foam to block sound leaks — a small difference with a big impact.
- Add broad absorbent surfaces—like blankets and foam—more than focusing on a few panels for overall improvement.
- Ensure your rig has proper ventilation — passive vents or ducted airflow prevent heat buildup and noise escalation.
- Understand the limits: a closet can improve sound but won’t fully block external noise or eliminate room tone.

Focusound 52 Pack Acoustic Foam Panels 1" x 12" x 12" Sound Proof Foam Panles Soundproofing Noise Cancelling Wedge Panels for Home Office Recoding Studio with 300PCS Double-Side Adhesive
Soundproofing - Acoustic foam panels triangular grooves structure for better noise absorption, helps to reduce and absorb unwanted...
As an affiliate, we earn on qualifying purchases.
As an affiliate, we earn on qualifying purchases.
Why Your Closet Can Be a Surprisingly Good Recording Space
Most people think small rooms, especially closets, are a nightmare for sound. But with the right approach, they can actually reduce echo and flutter echoes. The reason? Small volumes naturally dampen reflections, creating a cozy, controlled sound environment.
Imagine speaking into a mug — the tight walls focus your voice, minimizing roominess. The same applies to a closet. The challenge is avoiding that ‘boxy’ sound, which happens when you don’t treat reflections properly. But if you add some absorbent materials, it can sound warm and clear.
For example, a YouTuber converted a closet into a vocal booth using a handful of foam panels, rugs, and sealing gaps. The result? Clear vocals with minimal echo, without needing a professional studio.

Sonicism 12 Pack Pyramid Sound Proof Foam Panels with Self-Adhesive, 12" X 12" X 2" Acoustic Foam Panels of High Density, Soundproof Wall Panels Fast Expand, Sound Absorption and Decoration (Black)
👍【Professional Acoustic Treatment】Sonicism acoustic foam panels adopt a novel pyramid 3D design and high-density polymer material. The contact...
As an affiliate, we earn on qualifying purchases.
As an affiliate, we earn on qualifying purchases.
Acoustic Dampening vs. Soundproofing — What You Need to Know
Acoustic dampening and soundproofing aren’t the same. Dampening reduces echo and flutter inside a room — it makes the sound less ‘boomy’ — but it doesn’t block sound from escaping. Soundproofing, on the other hand, aims to prevent noise from leaving the space.
In a closet, you’re likely after dampening to improve clarity. Think foam panels, blankets, or rugs — these absorb reflections and reduce reverb, making your recordings clearer and more professional. However, they do little to stop sound from leaking out. If external noise is a concern, you’ll need to reinforce your door, walls, or add mass with dense barriers. Learn more about acoustic dampening and placement.
For example, a streamer used foam panels to improve voice clarity but still heard the neighbors’ footsteps through the door. Sealing the door with weatherstripping and adding a heavy curtain significantly reduced sound leaks, showing how combining dampening with sealing enhances your setup.
Understanding this distinction helps you set realistic goals: dampening improves the quality of your recordings, but it won’t isolate you from external noise. For complete silence, a dedicated soundproof room is necessary.

2 Pack Studio Monitor Isolation Pads for Large Speakers Sound Insulation Studio Foam Prevents Vibrations Acoustic Speaker Isolation Pad High Density Fits Most Stands
Enhanced Sound Clarity: Saiqiang speaker isolation pads can reduce vibrations and resonance, providing cleaner, more accurate sound from...
As an affiliate, we earn on qualifying purchases.
As an affiliate, we earn on qualifying purchases.
Where to Place Your Mic for Clear, Natural Sound
Placement is king. The best spot for your mic isn’t dead center or right next to the wall. It’s about finding the ‘sweet spot’ where reflections are minimized and your voice sounds natural.
Start by positioning the mic about 6-12 inches away from your mouth, angled slightly to avoid plosive hits. Use the proximity effect — getting closer boosts bass, so adjust accordingly. Moving the mic closer can also help reduce room noise because the direct sound becomes dominant over reflected sound.
In a closet, avoid placing the mic directly against a wall or corner, as this causes low-frequency buildup and a boxy tone. Instead, position it in the middle of the space, ideally near an open door or away from reflective surfaces. Slightly angling the mic can also help reduce unwanted reflections and plosive sounds.
For example, a content creator used a boom arm in the middle of her closet, placing foam behind her and in front of the mic, which resulted in warm, clear vocals with minimal room noise. Experimenting with position and angle can make a significant difference in achieving natural sound.

Ultimate Portable Vocal Booth for Home Recording, Reduces Echo & Reverb
The Original & Best Portable Vocal Booth — Snap Studio created the category. Pop-up recording space for singers,...
As an affiliate, we earn on qualifying purchases.
As an affiliate, we earn on qualifying purchases.
How to Treat Your Closet Walls, Ceiling, and Door for Better Sound
Start treating the surfaces that create the most reflections. In a closet, walls and ceiling are prime targets. Use a combination of foam panels, blankets, or DIY solutions like moving blankets stapled or taped in place. For ideas, see home acoustic panel treatments.
Focus on the first reflection points: the spots where sound bounces directly back to the mic. Use a mirror trick — have a friend move a mirror along the wall while you sit at the mic. Wherever you see the reflection, place absorbent material. This minimizes early reflections that can muddy your recordings.
The door is often the biggest leak point. Seal gaps with weatherstripping or foam tape. Even a simple blanket over the door can dramatically reduce sound escape. This not only improves your recording clarity but also prevents noise from entering.
In a recent DIY, someone used a curtain rod with moving blankets hanging over the door, which cut leakage by over 50%. Properly treating these areas prevents sound from bouncing around and leaking out, making your recordings cleaner and more controlled.
Bass Traps and Corner Treatment — Do You Need Them in a Closet?
Bass traps are designed to tame low-end buildup, which is common in small, enclosed spaces. If your recordings sound boomy or muddy, especially in the lows, consider adding bass traps in the corners. These traps help balance the frequency response, preventing low frequencies from dominating and causing a boxy or muffled sound. Check out corner treatment options.
In a tiny closet, low frequencies tend to accumulate in the corners due to boundary reinforcement, which can create a muddy or boomy tone. Filling those corners with thick panels or DIY traps made from rockwool or fiberglass can dramatically improve clarity. This makes your recordings sound more natural and less “boxy.”
For example, a YouTuber built DIY bass traps from thick foam and placed them in the upper corners of her closet. The difference? A cleaner, more balanced sound, especially at lower frequencies. If you notice your recordings lack clarity at bass frequencies, adding traps is a worthwhile investment.
Ventilation and Heat — Keeping Your Rig Cool in a Closet
Hot, high-performance rigs don’t like being sealed in a closet. They need airflow. Otherwise, heat builds up, fans spin faster, and noise skyrockets. Overheating can also reduce your hardware’s lifespan and performance.
The trick is to combine ventilation with soundproofing. Use passive vents or ducted airflow with proper acoustic dampening. quiet fans, or invest in a purpose-built soundproof cabinet with temperature control. Think of it like a high-end server room — cool and quiet, but with proper airflow management.
For example, a researcher used a ducted exhaust system with a small, quiet inline fan to keep his GPU rig cool inside a closet. This setup maintained stable temperatures while muffling the noise — a crucial balance for long recording or streaming sessions. Proper ventilation prevents thermal shutdowns and keeps noise levels manageable.
Limitations: When a Closet Setup Won’t Cut It
A closet isn’t a perfect soundproof room. External noise like traffic or neighbors will still leak in unless you do serious sealing. And even with treatment, you’ll get some room tone or a boxy sound if you don’t add diffusion or bass trapping.
Think of it as a ‘best effort’ solution, not a soundproof fortress. It’s great for improving voice clarity and reducing echo, but not for complete isolation. External noises can still seep through gaps, and untreated reflections can cause coloration or muddiness in recordings.
For example, a streamer reported that her closet setup cut her noise by about 80%, but she still heard her neighbor’s dog barking and some street noise. It’s a tradeoff — more treatment and sealing help, but absolute silence and perfect acoustics require a dedicated studio environment. Recognizing these limits helps you set realistic expectations and avoid frustration.
Frequently Asked Questions
Does a closet actually sound good for recording?
Yes, in small, untreated spaces, a closet can produce a warm, controlled sound because of its limited volume. But it can also sound boxy or muddy if not treated properly. Proper placement and broad absorption make a big difference.What’s the difference between acoustic treatment and soundproofing?
Acoustic treatment reduces echo and flutter echoes inside a room, making recordings clearer. Soundproofing prevents sound from escaping or entering, which requires dense barriers and sealing. They serve different purposes but often overlap.Where should I place the mic in a closet booth?
Position the mic about 6-12 inches from your mouth, avoiding corners and reflective surfaces. Aim for a spot where reflections are minimized, often near the middle of the space or slightly away from the walls.Should I treat the walls, ceiling, or door first?
Start with the first reflection points—walls and ceiling near the mic. Seal gaps around the door to prevent leaks. Broadly covering surfaces with blankets or foam yields better results than focusing on just one area.Do I need bass traps in a small closet?
If your recordings sound boomy or muddy, especially at low frequencies, adding bass traps in the corners can tame low-end buildup. DIY traps from foam or rockwool work well for small spaces.Conclusion
Your closet can be a surprisingly effective sound space—if you treat it right. Focus on placement, sealing gaps, and adding broad absorbent surfaces. Remember, the goal isn’t perfect silence, but a clear, warm tone that makes your voice stand out.
And when it’s time to go louder? Moving the rig into another room or a purpose-built cabinet often beats any foam or panel trick. The key is understanding what works, what doesn’t, and how to get the best sound with what you’ve got.